Database and Library Design for Customer Order Management System
Introduction
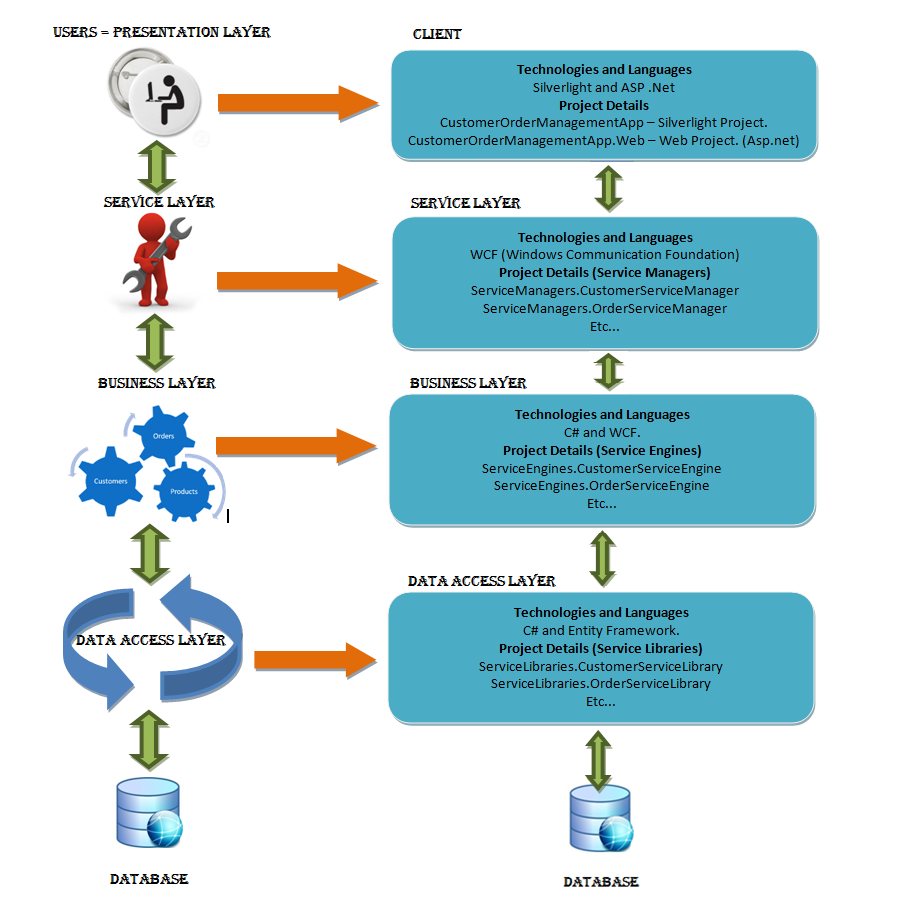
- Part 1 (Distributed Application Layers with project details): Learn about what layered design in distributed environment is and how we are going to name it while implementing the actual app.
- Part 2 (Database and Library Design): Learn about database design and implementing library which interacts with Edmx container.[This article]
- Part 3 (Engine and Service Managers design): Learn how to implement the engine which has core business logic and implementing the actual WCF service with service contracts. And also how to test the service using test client.
- Part 4 (Client implementation): Learn how to implement the actual client with MVVM pattern which invokes services.
This is the second article in a canonic series about the Enterprise Application Architecture design. In the previous article, we discussed about distributed application layers and how we goanna implement these layers in sample application (Customer Order Management System (COMS)). So in this article I am going to describe about database design, entity container and library implementation. Project names will remain very same as mentioned at the right side of architecture diagram explained in part 1.
Background
The very first thing in any application design is creating the underlying database to support it. We should be very careful while designing database since we have to cover most possible business logic in database itself instead of writing in client side code. To be frank, I am not an expert in database design. Please feel free to comment if you think something is less accurate. Let's start our database design.
Customer Order Management System Database Design
I'll take few sample use cases for implementation in COMS (Customer Order Management System) with these four tables for a demonstration.
- Customer Table - Contains customer data such as name, id, address, shipping address, billing address, etc.
- Product Table � Contains product data such as product name, description, unit price, etc.
- Order Table - Contains data on when an order was placed including Customer ID, order date, shipping date, etc.
- OrderDetail Table - Contains data on each product ordered on one order (Because you can purchase multiple items on single order) including the product ordered, quantity, unit price, discounts, etc.
As you might be aware, for a relational database to work properly you should have a field in each database that uniquely identifies (Primary Key) that row in your database table. Also, we should have link the table based on its relationship (Foreign Key). The table below illustrates relationships between the tables.
Table and Key Details
| Table | Primary Key |
| Customer | CustomerID |
| Product | ProductID |
| Order | OrderID |
| OrderDetails | OrderDetailsID |
Table Relationship Details
| Table | Related With | Foreign Key |
| Orders | Customers | CustomerID |
| OrderDetails | Orders | OrderID |
| OrderDetails | Products | ProductID |
Have a look in to the below mentioned database design image for more idea.

(Figure 1 � Customer Order Management System Database Design diagram)
Create Database and Tables in Microsoft SQL Server.
Before creating the tables, we have to create our own database in SQL Server. Please note that, I am using Microsoft SQL Server Management Studio Express for creating database and tables.
Open the Microsoft SQL Server Management Studio Express and you could see the window as given below.

(Figure 2 � Microsoft SQL Server Management Studio Express)
Now, for creating the database, please follow the steps as mentioned here by ms tech net guys. I assume that you are giving database name as Customer Database. After creating the database, you could see some predefined objects getting displayed under your database in object explorer tree such as Tables, Database Diagram, etc. Please see the below Image.

(Figure 3 � Customer Order Management System Database)
Now we are all set to go ahead with table creation.
To create a new table with Table Designer
- Right-click the Tables item of your database in Object Explorer and click New Table.
- Type column names, choose data types, and choose whether to allow nulls for each column.
- From the File menu, choose Save table name.
- In the Choose Name dialog box, type a name for the table and click OK.
Create all the four tables that I have mentioned in the database design section with proper primary key. After creating all the tables, we also have to create foreign key for the tables as I have mentioned in database design section.
You can create foreign key using SQLQuery analyzer. Click the New Query button which is available in the SQL Express toolbar, and paste the below queries in query window, select all the queries and press F5. Once you're done with this, foreign key will be created automatically.
![]() Collapse | Copy Code
Collapse | Copy Code
ALTER TABLE Orders WITH CHECK ADD CONSTRAINT [FK_CustomerID] FOREIGN KEY([CustomerID])
REFERENCES [Customers] ([CustomerID])
ALTER TABLE OrderDetails WITH CHECK ADD CONSTRAINT [FK_OrderID] FOREIGN KEY([OrderID])
REFERENCES [Orders] ([OrderID])
ALTER TABLE OrderDetails WITH CHECK ADD CONSTRAINT [FK_ProductID] FOREIGN KEY([ProductID])
REFERENCES [Products] ([ProductID])
I assume that you have done everyhting successfully upto this stage. Oh great :). Now we're done with customer order management system database design . See the below image which has four tables and some sample customer's data.

(Figure 4 � Customer Order Management System Database with Tables)
I hope that you have got an idea about how to design the database.
Entity Container and library Implementation
As we discussed in architecture diagram which is explained in part 1, we are going to discuss and implement the second level from the bottom (Data Access Layer). See the given below image.

(Figure 5 � Library details)
You could see that I have mentioned clearly about what language and technology we are going to use for implementing this layer with projects name details. So before starting with implementation, will discuss bit about the purpose of this layer.
Typically Data Access Layer is for communicating with database to store/retrieve the data. Earlier, we used to write this layer with the help of pure ADO.NET. But now, .Net framework provides ADO.Net Entity Data Model utilities by default. So using Entity Data Model Wizard we can create edmx file which describes the target database schema, and defines the mapping between the EDM and the database.
Why class library for interacting with edmx? Can't we use edmx file directly in business logic layer? Yes. Better not to use edmx file directly in business logic layer. Business logic should be an independent layer. If you use edmx file directly in business logic, that means you are losing extensibility of your platform. For instance, if you add some additional field in the database; you have to touch your business logic again. To avoid this dependency, we are exposing interfaces and methods in library to interact with the edmx file.
Create EDMX and Library Projects
We are here to learn how to create these two projects and what type of project templates needs to be selected.
Type of projects
- A Class Library
- An Entity project with an edmx
- A Test Client project
The Solution
Open Visual Studio 2010 and select the Class Library project template from Visual C# -> windows. Look at the solution and project name in the given snapshot.

(Figure 6 � Project Template For Library)
I have given the same name ("ServiceLibaries.CustomerServiceLibrary") as mentioned in the architecture diagram. I have added two folders and .cs files for the implementation in solution. One is for CustomerServiceLibrary interface and another one is for actual method implementation. But don't worry; there is no code inside the files now. Here is the structure of my VS solution.

(Figure 7 � Library Project)
Let's start creating edmx file and then will get back to the actual library implementation. Here are the steps for generating edmx file from specific database.
- In solution explorer, right-click on the solution, add one more project for maintaining edmx files. Keep the project name as "CustomerOrderManagementSystemDEM".
- Right-click CustomerOrderManagementSystemDEM project, and then click Add-->New Item.
- From the Add New Item dialog box, select Data in the left pane and select ADO.NET Data Entity Model.
- In Name, enter edmx file name "CustomerOrderManagementSystemEntityDataModel" and click ok.

(Figure 8 � Solution with Edmx project)
Now you will be asked to proceed with Entity Data Model Wizard. Select Generate from Database option from the wizard and choose your data connection from the combo box. If you don't find your database in combo box, click the New Connection button and choose your Server name, Data source, Authentication type(Leave it as Use Windows Authentication), Database name "Customer Database" and click ok.

(Figure 9 � New Connection Dialog Window)
Then you will get the page with connection string details as the given below. Click the next button and choose the tables that you want to generate entities. I selected all the four tables. Change the model namespace at bottom of the dialog window (optional), and click Finish button.

(Figure 10 � New Connection String)

(Figure 11 � Complete Database)
When you hit Finish button, visual studio starts generate the edmx file with app.config file for you. Once it's generated, you could see ConnectionStrings tag in xml file with other attributes such as connection string and provider name details.
![]() Collapse | Copy Code
Collapse | Copy Code
<?xml version="1.0" encoding="utf-8"?>
<configuration>
<connectionStrings>
<add name="Customer_DatabasesEntities" connectionString="metadata=res://*/CustomerOrderManagementSystemEntityDataModel.csdl|res://*/CustomerOrderManagementSystemEntityDataModel.ssdl|res://*/CustomerOrderManagementSystemEntityDataModel.msl;provider=System.Data.SqlClient;provider connection string='Data Source=XXXXX-PC\SQLEXPRESS;Initial Catalog="Customer Databases";Integrated Security=True;MultipleActiveResultSets=True'" providerName="System.Data.EntityClient" />
</connectionStrings>
</configuration>
Apart from the configuration file, .edmx file (with code-behind) also generated. If you open .cs file, you could see all the tables generated as an entity object class along with default object context class ("Customer_DatabasesEntities"). These are the class that we are going to use in our library to interact with database.

(Figure 12 � Entity Objects and Object Context Class)
That's it. We're done with the edmx file generation. Let's come back with library implementation, as we discussed already, we have two .cs files in library project. Now we can directly go ahead with implementation part. Here is the ICustomerServiceLibrary interface which contains the methods declaration to provide customer details as well as saving data in database.
![]() Collapse | Copy Code
Collapse | Copy Code
public interface ICustomerServiceLibrary
{
/// <summary>
/// Get all the customers data
/// </summary>
/// <param name="context"></param>
/// <returns></returns>
List<Customer> GetCustomers(Customer_DatabasesEntities context);
/// <summary>
/// Get specific customer data with customer ID
/// </summary>
/// <param name="customerID"></param>
/// <param name="context"></param>
/// <returns></returns>
Customer GetCustomer(int customerID, Customer_DatabasesEntities context);
/// <summary>
/// Get the actual Entities object context from edmx.
/// </summary>
/// <returns></returns>
Customer_DatabasesEntities GetEntitiesObjectContext();
/// <summary>
/// Save the data in database with specific context.
/// </summary>
/// <param name="context"></param>
void Save(Customer_DatabasesEntities context);
}
Interface provides four functionalities.
- GetCustomers � Returns all the customers data from database with the help of entity object context.
- GetCustomer(int CustomerID) � Returns the specific customer details which takes customer id as argument.
- GetEntitiesObjectContext() � Returns the actual Customer Databases Entities object context.
- Save (context) � Saves the data in database.
Let's go ahead with actual implementation of the methods
![]() Collapse | Copy Code
Collapse | Copy Code
namespace ServiceLibraries
{
public class CustomerServiceLibrary : ICustomerServiceLibrary
{
// Database entity context.
Customer_DatabasesEntities context = null;
/// <summary>
/// Constructor which initialize including context.
/// </summary>
public CustomerServiceLibrary()
{
context = new Customer_DatabasesEntities();
}
#region ICustomerServiceLibrary Members
/// <summary>
/// Returns customers data as list.
/// </summary>
/// <param name="context"></param>
/// <returns></returns>
public List<Customer> GetCustomers(Customer_DatabasesEntities context)
{
return context.Customers.ToList() ;
}
/// <summary>
/// Returns specific customer detail.
/// </summary>
/// <param name="customerID"></param>
/// <param name="context"></param>
/// <returns></returns>
public Customer GetCustomer(int customerID, Customer_DatabasesEntities context)
{
var cust = from customer in context.Customers where customer.CustomerID == customerID select customer;
return cust.FirstOrDefault();
}
/// <summary>
/// Saves the data in database and disposing the context.
/// </summary>
/// <param name="context"></param>
public void Save(Customer_DatabasesEntities context)
{
context.SaveChanges();
context.Dispose();
}
/// <summary>
/// Returns the context reference.
/// </summary>
/// <returns></returns>
public Customer_DatabasesEntities GetEntitiesObjectContext()
{
return context;
}

No comments:
Post a Comment